
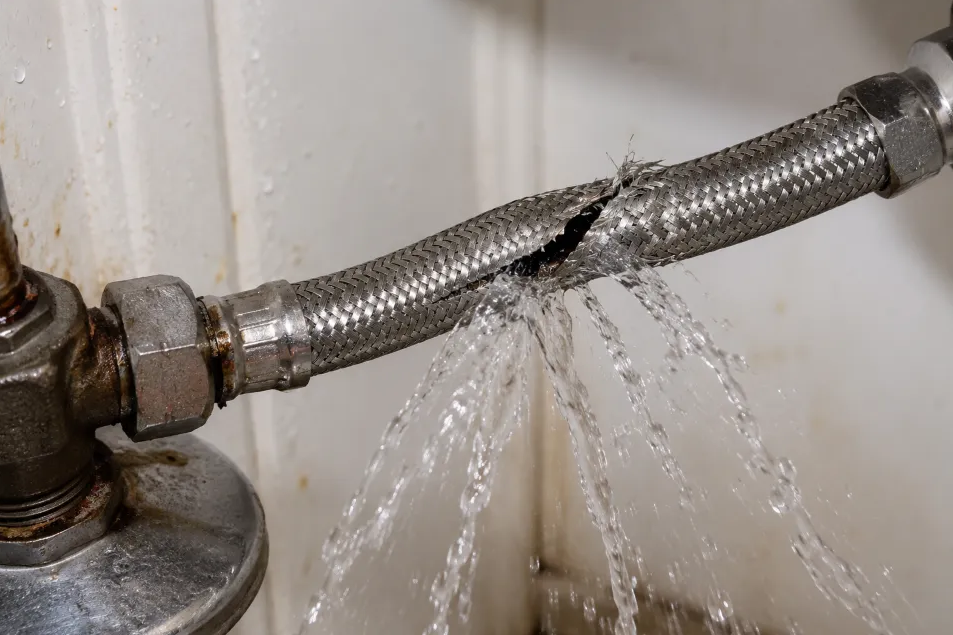
Most burst hoses are not bad luck. They are usually the end result of small installation or maintenance mistakes made months or years earlier. Water damage and freezing account for roughly 29% of all homeowners insurance claims (Insurance Information Institute), and a failed supply line under a sink or behind a toilet can dump gallons in minutes while no one is home.
Overtightening the nut does more harm than good
Most people assume tighter is safer, but that does not apply to a flexi hose.
The seal forms when the rubber washer presses flat against the face of the tap or valve. The threads simply hold that contact in place. Finger-tight plus a quarter turn with a small wrench is enough for most domestic plumbing jobs.
When you go past that point with a long shifter, the washer gets squashed out of shape. It can split at the edge or squeeze out to one side. On plastic inlets, the extra force can crack the thread root, and that crack may not leak on day one.
Read More: What Should Landlords Look for in an Ilford Letting Agent?
We see this often in our work when someone has tried to stop a small drip by giving the nut one more hard pull. The drip stops for a week. Normal pressure cycling then works on the distorted washer, and the drip returns as a spray.
Don’t crank it down.
If you need tools, hold the valve body steady with one wrench and turn the hose nut with another. Stop when it feels snug, then wipe the joint dry. Check it after ten minutes and again the next morning, once the line has been through hot and cold cycles. If it weeps, pull it apart and reset the washer rather than tightening it further.
Forcing a nut that doesn’t want to start
A cross-threaded nut feels tight, but it is not sealed.
This happens when the nut goes on at a slight angle or the threads do not match. Brass and plastic valve inlets are easy to damage this way. One forced turn can shave a thread, leaving the washer sitting crooked so water finds a path around one side.
The worrying part is that it can hold for weeks. Pressure goes up and down each day, while hot water softens washers and seals. The crooked nut shifts a fraction. Then it lets go all at once.
Avoid this by starting every connection by hand. Spin the nut on using your fingers only. It should turn smoothly for several full turns without effort. If it binds early, back it off, inspect the threads and clean out any grit before trying again.
Don’t reach for the wrench until the nut is well on. If you feel grinding or it locks after half a turn, stop. More force will not correct the alignment.
Match the fittings before you start. Don’t mix parallel and tapered threads or reuse a nut with flattened or shiny threads. A licensed plumber will have the right adaptor on the van and will not need to force anything into place.
Bending the hose too hard or fitting it twisted
A braided stainless steel jacket looks tough, although the inner tube is not.
Every flexi hose has a minimum bend radius. Fold it more tightly and the inner rubber tube kinks, reducing flow and putting the full load on one small area of the braid. That spot rubs each time the pressure pulses. Months later, the outer wires break there and the tube balloons out.
We often find this behind crowded vanities. The hose has been jammed into a sharp U to fit around cleaning bottles and traps. It looks neat from the front, but behind them the bend is almost flat. You cannot see the damage until the hose fails.
Read More: 10 Uses for Stone Veneer That Make More Sense than Covering Every Wall
Twisting causes similar hidden damage. It happens when you spin the nut without holding the hose, causing the whole body to turn half a turn and store that twist in the braid. Over the following months, the hose tries to unwind and may loosen the nut. The result is a slow weep inside a dark cabinet where no one looks.
Don’t let the hose fight itself.
Hold the hose body still while you tighten the connection. Keep loops gentle and round, with enough room around the hose to prevent it rubbing against sharp edges. If the run is too short for a soft curve, buy a different length. A longer hose with a smooth loop lasts far longer than a short hose pulled tight.
Spotting trouble before the braid lets go
Small leaks rarely stay small.
A weep at the nut means the washer no longer seals. White crust or green fuzz on the brass nut shows that water has been escaping and drying, while a damp cabinet base or musty smell suggests it has been happening for some time. Rust-coloured water at first flow can point to corrosion inside the line.
Don’t ignore a bulge.
By the time a bulge is visible, the braid has already lost strands. The inner tube is holding pressure on its own, and it was not built to do that for long. If you spot a bulge, a weep at the nut, a soft and swollen cabinet floor or a green corrosion crust on a burst flexi hose, the hose is compromised. Failure is a question of when, not if.
There is a quick check you can do now.
Run a dry finger around each nut and ferrule, then look along the braid with a torch. Feel for damp and sniff for mould. Pull everything out from under the sink so you can see the full hose and the cabinet floor clearly.
We’ve opened cupboards where the base had swollen like a sponge. The owners thought the smell was coming from the drain, but it was a pinhole spray that had been misting for months. A five-minute look would have caught it. Anything that looks damp or crusty is replace now, not next month.
Doubling up washers and misusing thread tape
Adding more sealing material does not create a better seal.
Double washering is common. Someone leaves the old washer inside the nut and drops a new one on top, or adds a fibre washer for luck. The two pieces never sit flat. Water works between them and pushes one edge out, creating an extrusion path that drips constantly and soaks the cabinet base.
One washer seals well. Two washers wobble.
The fix is straightforward. Remove the old washer completely and check the seat for grit. Fit one new washer of the correct size, making sure it sits flat before you tighten the connection.
Thread tape causes the same kind of slow leak when used in the wrong place. PTFE tape is made for tapered threads that seal on the threads, while flexi hoses seal on the washer. Tape on the face prevents the washer from meeting the metal cleanly. It wrinkles and leaves channels for water.
Don’t add tape to a washer joint.
Debris can cause similar damage. After recent plumbing work, tiny pieces of swarf or grit may remain in the line. They can lodge beneath the washer and hold it open a fraction, causing the joint to weep. Wipe the faces clean and flush the line briefly into a bucket before connecting the hose. That thirty-second step can save a lot of grief.
Keeping old hoses and buying unmarked stock
Flexi hoses do not last forever.
The trade treats five years as the change interval. Rubber hardens and braid wires fatigue, while brass nuts and ferrules can suffer corrosion in poor water chemistry. The date stamp on the nut tells you where you stand. If you cannot read a date, assume the hose is old.
We’ve seen twenty-year-old hoses still in service under laundry tubs. The owners had no idea they were meant to be replaced. The braid looked dull, with several strands puffed out. It was luck that the hoses had not already failed.
Don’t buy on price alone.
Cheap imports sold online often have no compliance mark or date stamp. The braid may be thin, the washer may be poor quality and the threads are often rough and uneven. The saving amounts to a few dollars, compared with the risk of a flooded kitchen.
Look for clear branding on both the hose and nut, along with a date stamp you can read. Check for a flexible-hose compliance mark showing that the product was tested to the relevant standard. Keep the receipt, write the installation date on masking tape around the isolation valve and take a photo of each date stamp for your records. That way, the next person knows when the hoses were installed.
If your hoses are past five years, plan the swap. A licensed installer can replace several in one visit and check the valves at the same time.
High pressure and no shut-off plan
Pressure damages hoses quietly.
Mains pressure above 500 kPa shortens hose life considerably. It hammers the washers and braid every time a tap closes. Fast-closing appliances such as dishwashers and washing machines add sharp spikes called water hammer. You do not hear the damage happening, but may later see the result as a split ferrule.
We tell clients that a pressure test is quick and inexpensive, and it often explains why washers keep failing in homes with no obvious installation fault. If the pressure is high, a pressure limiting valve keeps it within a safer range. A plumber can test the pressure in minutes using a gauge on a garden tap or laundry valve. If yours sits high, don’t leave it unaddressed.
Know where your isolation valves are as well.
Every flexi hose should have a working quarter-turn tap nearby. Turn it clockwise to shut it off and test each one twice a year. If a valve will not budge or it drips from the stem, have it fixed by a licensed plumber while it is still a small job.
When you leave the house for days, shut them off if they operate correctly. It takes thirty seconds and removes the main risk while you are away. This one habit prevents more damage than any other tip in this post.
Do this five-minute check this week. Feel each hose for bulges or rust, look for green or white crust on the nuts and inspect cabinet floors for swelling or stains. Read the date stamp and carefully cycle each isolation valve shut and open. Book replacement for anything past five years or showing visible wear.
Water finds weakness fast. Give it fewer places to start.



More Stories
The Stuff in Your Water That Ruins More Than Just the Taste
How to Deal with a Plumbing Emergency
How to Fix a Clogged Toilet On Your Own